
Character Creation / Animation / Houdini
From AI Faces to Animated 3D Characters with Headshot 3
Written guide
Before you start
- A clear frontal portrait and optional side and body references you have permission to use.
- Licensed software and motion assets; basic familiarity with Character Creator, iClone and Houdini.
Watch the experiment
Watch the full experiment, from reference preparation and character refinement to animation in iClone and the final Houdini scene.
Playing loads YouTube content. YouTube processes data after activation.
Watch on YouTubeIf the player is blocked or unavailable, use Watch on YouTube.
11:02 · AI-generated narration · Actual software recordings.
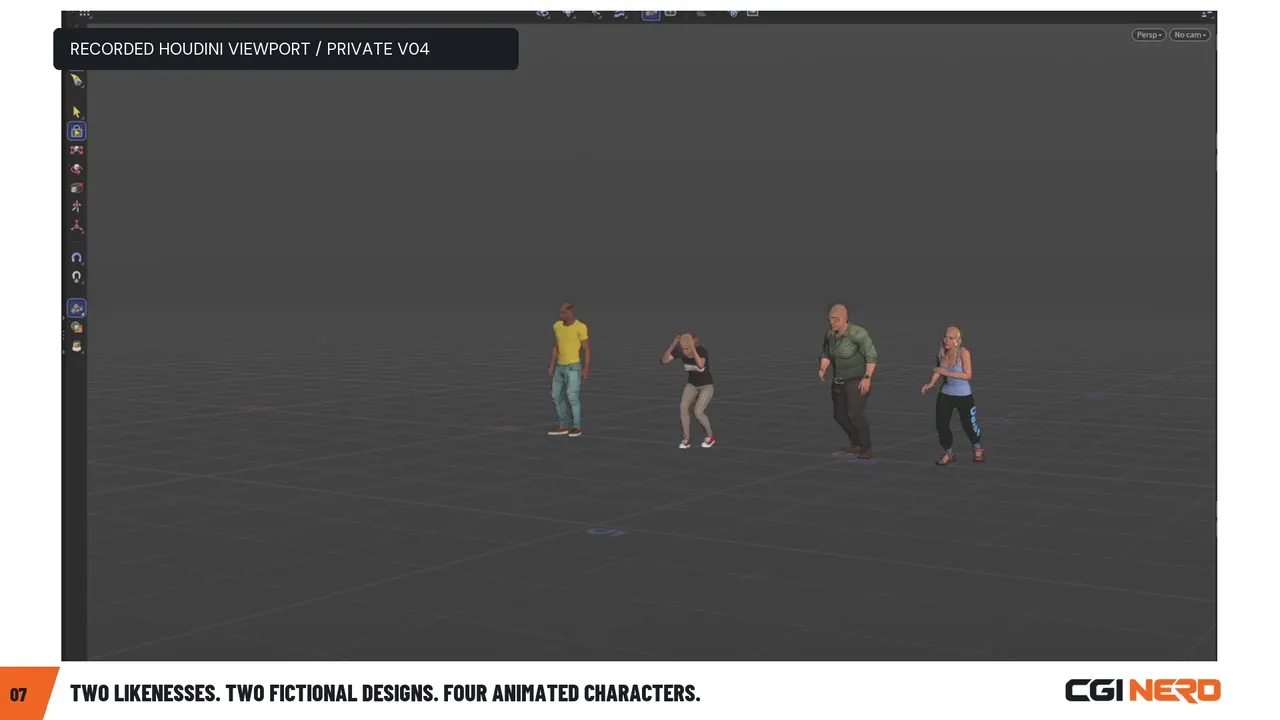
Four faces. Four editable characters. Four distinct performances—and a Houdini scene that brought them together.
I wanted to explore how photographs and AI-assisted character references could become editable 3D characters in my Houdini workflow. Headshot 3 gave me a starting point, Character Creator let me refine each character’s appearance, and iClone let me try animations I already owned. Bringing those characters into Houdini gave me a chance to see them perform together and revisit choices along the way. What I valued was the creative control throughout that process: refining a face, changing an outfit, testing movement, and carrying those changes forward.
The result—and what it really demonstrates
Two characters started from real photographs (including me); two were original fictional faces generated with AI. I prepared reference images with ChatGPT and Google Gemini, used Headshot 3 in Character Creator 5 to generate and refine editable characters, gave each a separate motion in iClone, and brought the results into Houdini using exported FBX character and animation data.
The Houdini result is a manually assembled scene of four animated characters. It is not a procedural crowd simulation with agent behaviors or automatic avoidance. That distinction matters if you want to reproduce this exact test.
Four individually built characters, each with animation, arranged in one Houdini scene. The viewport is a working production preview.
1. Prepare references for modeling, not just attractive portraits
I started with front, side, and full-body reference images. ChatGPT and Gemini helped turn my original photographs into neutral modeling guides and supplied designs for fictional characters. I deliberately removed hair from some of the guides so I could compare forehead, skull, ears, and the underlying facial silhouette without a hairstyle getting in the way. I also kept expressions relaxed: a smile or squint changes the shape you’re trying to match around the eyes and mouth.
For the body, a straightforward standing pose made shoulder width, torso length, hips, legs, and the overall silhouette easier to compare. Those AI-created images were orthographic-style illustrations, not measured or calibrated orthographic photographs. Treat them as visual guides, then judge the actual model inside Character Creator.
AI-prepared modeling guides are visual references, not calibrated scans.
Try this: Start with a clear, evenly lit forward-facing portrait. A side view can improve your judgment of depth and profile. For a body reference, avoid dramatic poses and cropped limbs. Inspect your input images before spending time refining the generated mesh.
2. Load the images in Headshot 3
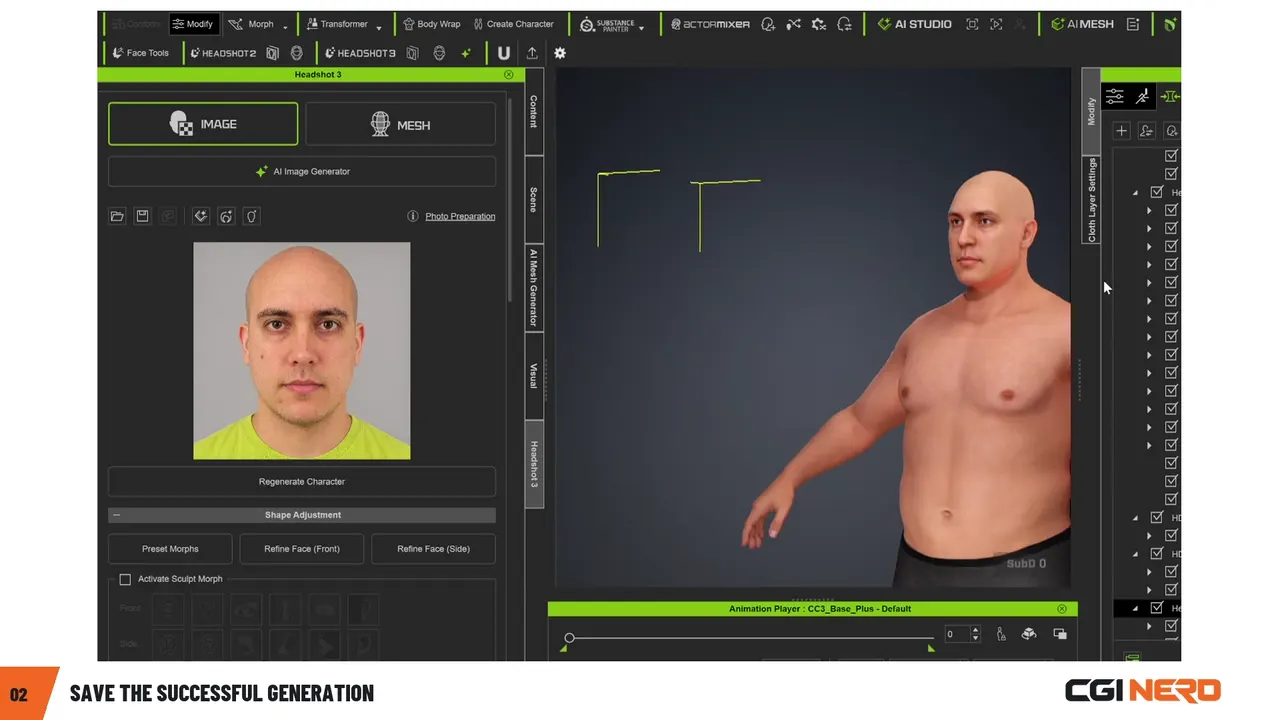
Inside Character Creator 5, I used Headshot 3’s Image Mode. I loaded the frontal portrait into the head image slot, added a profile reference, and supplied the full-body image in the body section. I then selected a starting body and generated the character.
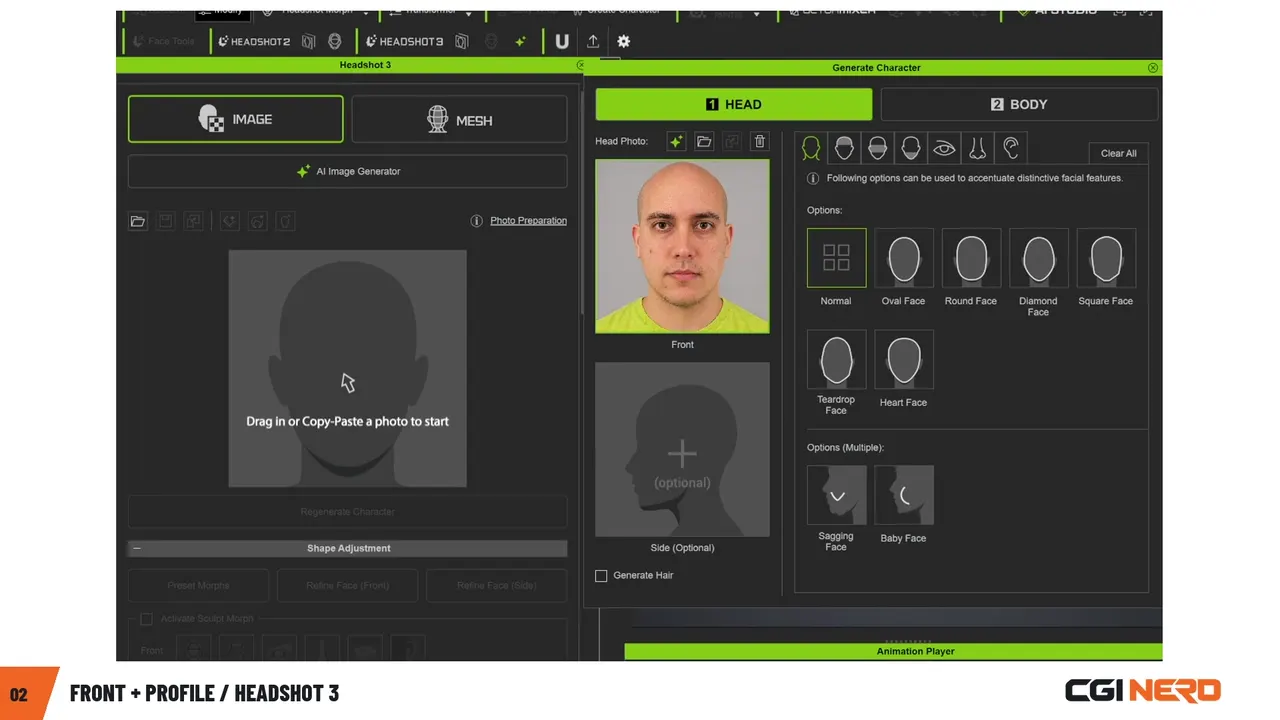
Start with the frontal image and add a side view if you have one.
The optional side image is a guide for later profile refinement; Reallusion documents that it does not change the automatic generation result.
Headshot 3 also includes an integrated AI photo generator for creating reference images. I did not test that feature in this project; I prepared my images externally with ChatGPT and Gemini. My results should not be read as a comparison between the external tools and Reallusion’s generator.
The first result is a starting point, not the final likeness. Once it was generated successfully, I saved the Character Creator project immediately.
3. Refine the face, then add personality
I compared the generated head with the front and profile images, adjusted facial landmarks, turned the head to inspect its silhouette, and used Sculpt Morphs for details such as head and ear shape. Small changes matter. I found it more useful to alter one visible difference, orbit the model, and evaluate again than to push many sliders simultaneously.
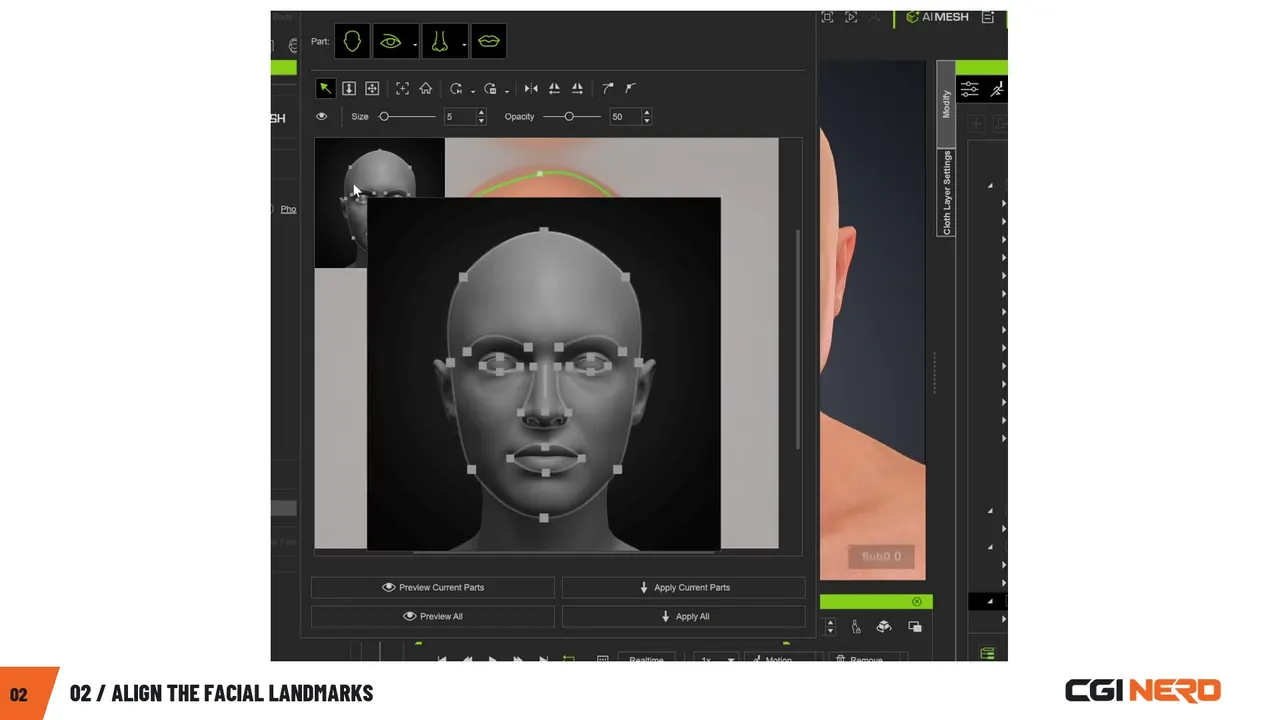
Line up the landmarks before judging the finished face.
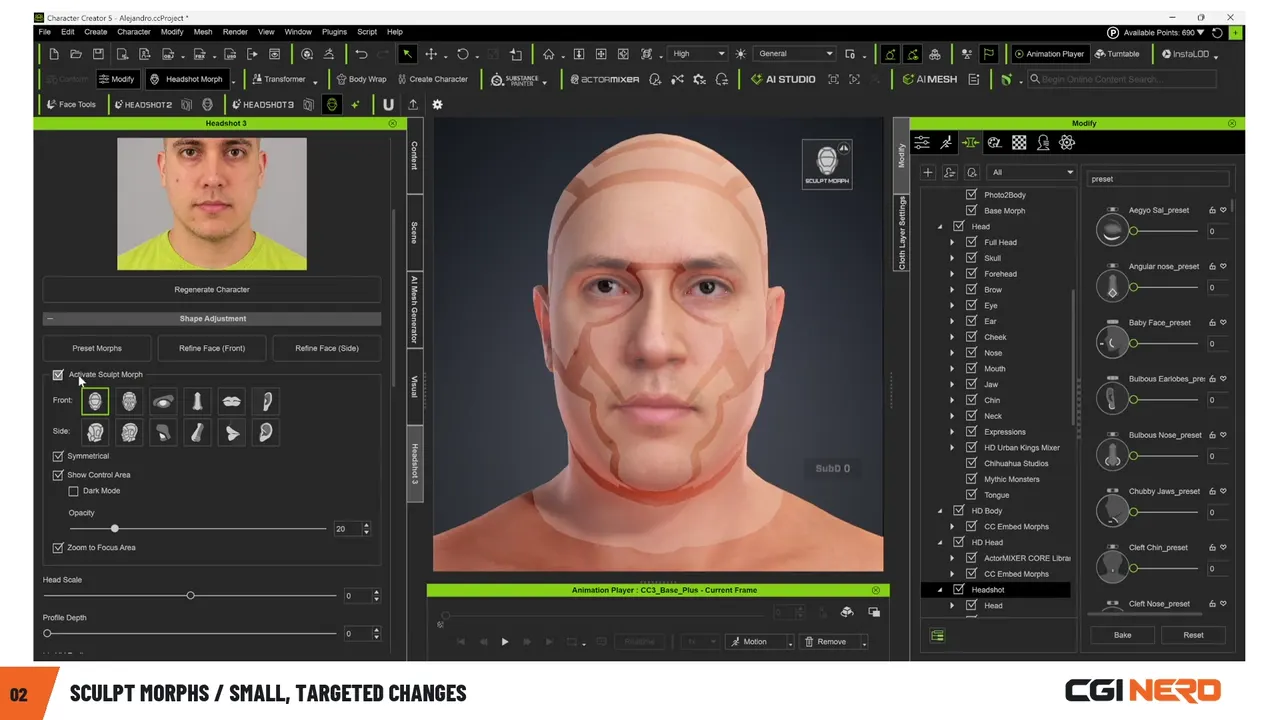
Check the profile as well as the front; a good frontal match can still have an inaccurate silhouette.
After facial refinement, I checked the character’s movement, then added hair, clothing, glasses, and other accessories. The hairstyle was a separate creative choice—I could adjust its color or try another style without rebuilding the face.
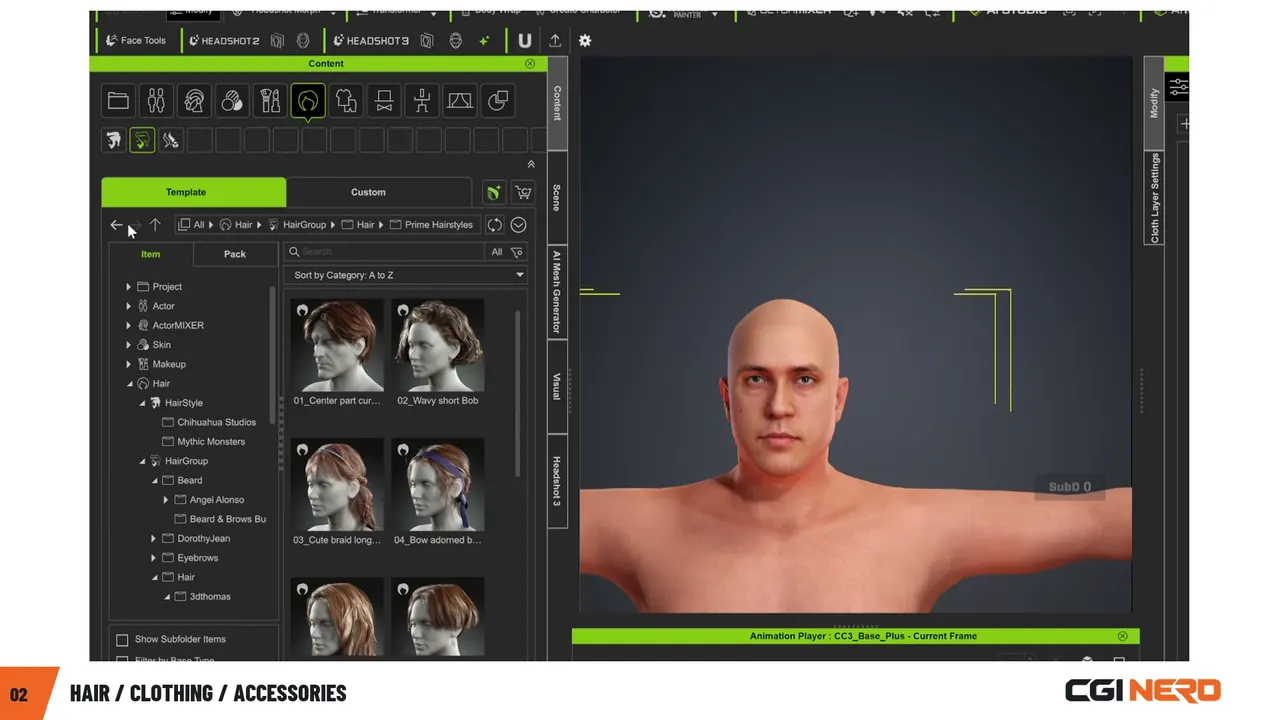
Build the likeness first, then explore the character’s presentation.
4. Repeat the workflow for the other three characters
The second character began as a completely fictional AI-generated female portrait. The third used photographs of my wife as the basis for neutral AI-assisted modeling references. The fourth began as another fictional AI-generated design. Each went through reference preparation, Headshot 3 generation, face/body adjustments, and Character Creator styling.
The outcome was a cast of four editable character projects rather than four fixed images. Because the underlying characters remained editable, I could revisit their outfits even after starting the Houdini work.
During this experiment, I noticed that three of my four initial character-generation attempts ended in application crashes. Once each character generated successfully, however, I was able to continue refining and customizing it without significant issues.
I haven’t investigated the underlying cause, so I can’t say whether this behavior was specific to my setup or something others might encounter.
As with any 3D production workflow, I recommend saving your progress regularly. Once a character has generated successfully, save the project and create additional versions as you make significant changes.
5. Apply motion in iClone
I used Send to iClone to move the finished characters over without rebuilding them. In iClone I chose existing motion clips for the different characters, played each action, and checked whether it suited the character. One motion included taking a picture and running, which gave the scene a readable little action rather than four identical performances.
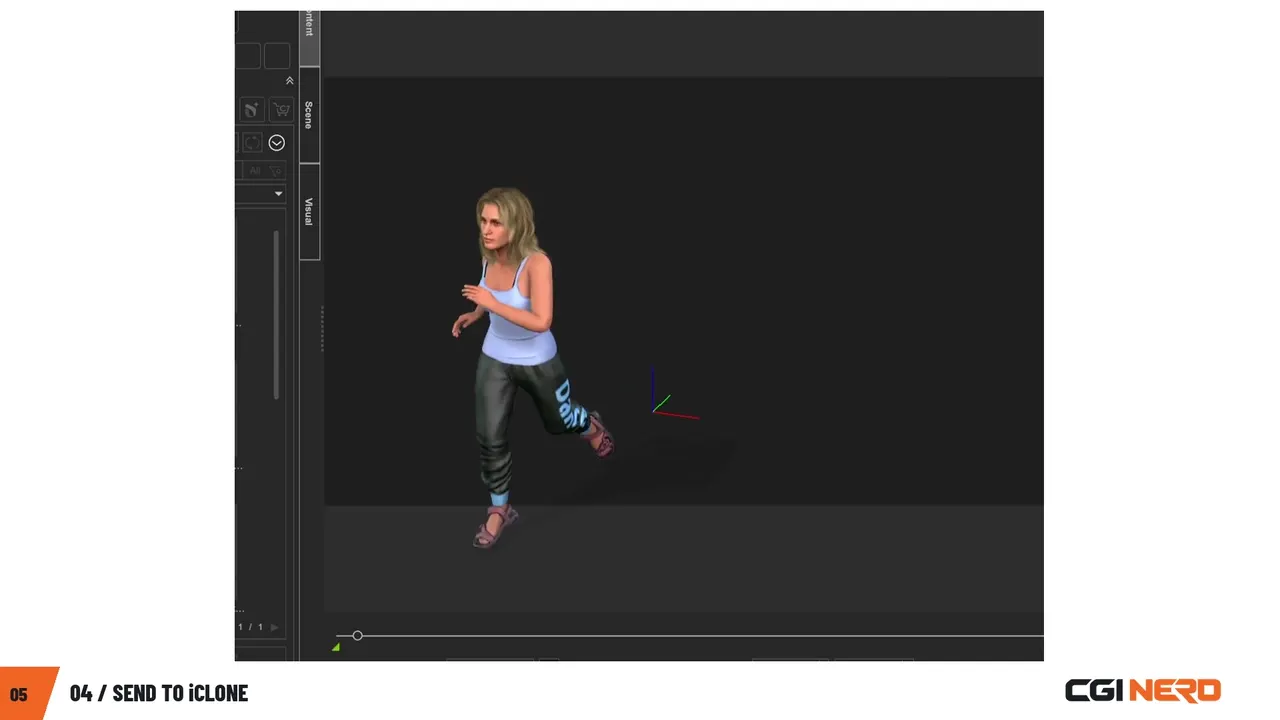
Assign and inspect each performance before exporting. Check the motion’s full frame range rather than relying on the pose in one frame.
6. Export the character and its animation as separate FBX inputs
For the animation I used File → Export → FBX in iClone, with the Maya target preset at 24 fps. One recorded clip showed a frame range of 0–664; other motions had their own ranges. I used Embed Textures for this particular export. These are the settings in my recorded test, not universally optimal settings for every Houdini, game-engine, or Reallusion pipeline.
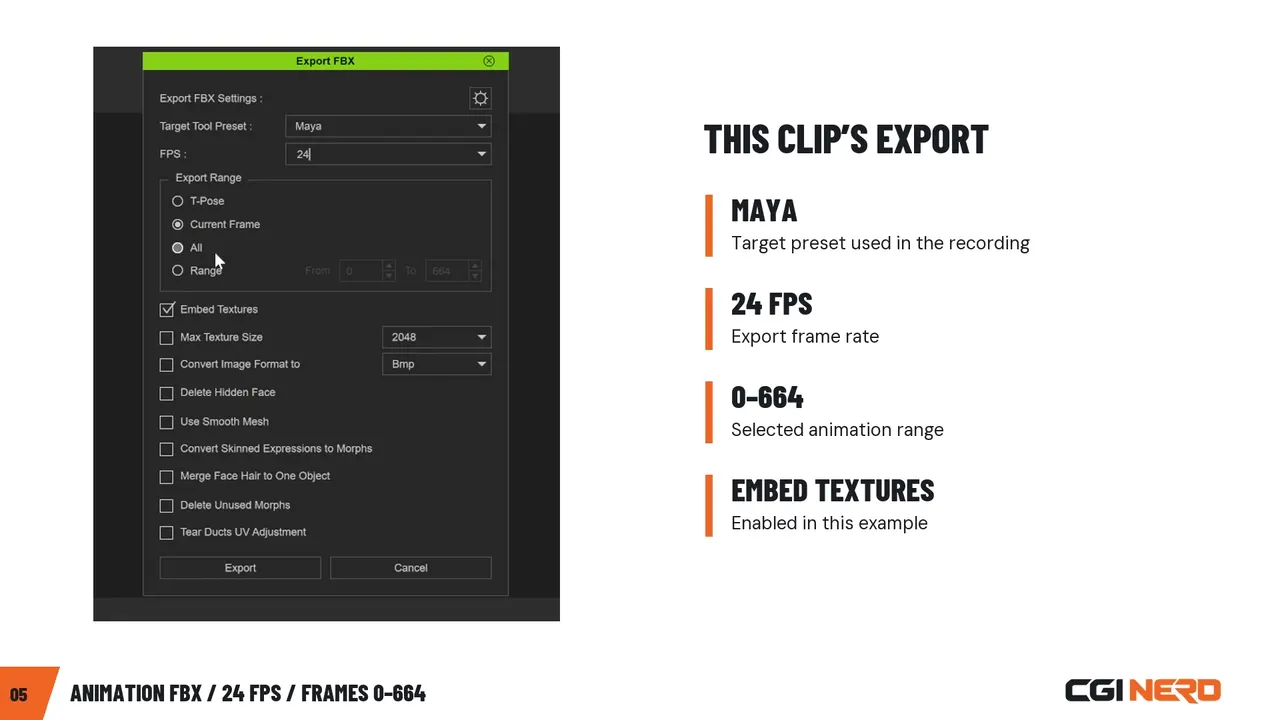
Verify target preset, frame rate, clip range, and texture choices for each export.
I also exported the complete clothed character from Character Creator. In my project, I embedded textures, removed hidden faces, and left subdivision at zero. The important conceptual separation is that the character geometry and its skeletal animation need to correspond. Keep filenames and source versions organized so you don’t inadvertently pair one character with the wrong performance.
7. Connect the animation to the character in Houdini
In Houdini 22, I created a Geometry container and loaded a character with FBX Character Import. I checked the mesh, skeleton and appearance in the viewport. A few stray points appeared in my imported geometry, so I used a Clean node; I also used a Color node to improve working-viewport readability.
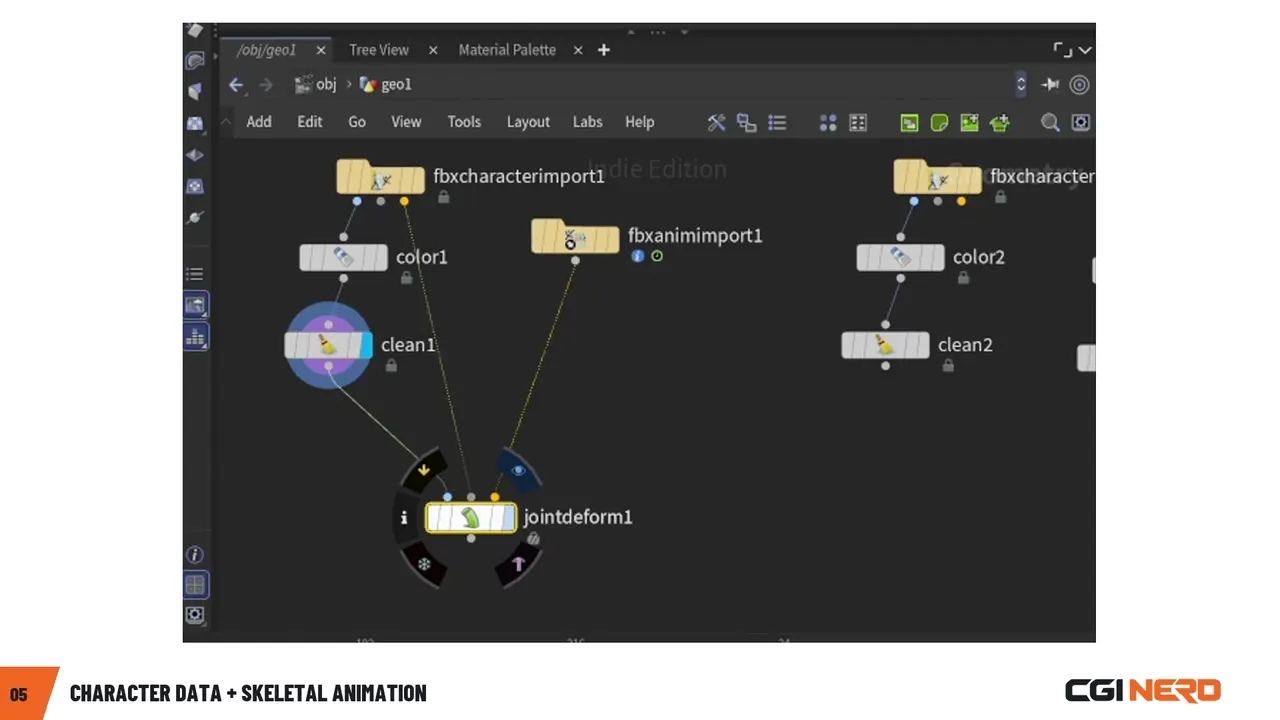
Inspect one imported character before adding motion or duplicating the branch.
I brought in the matching motion with FBX Animation Import. Joint Deform connects the character geometry, its capture/rest pose, and the animated skeleton so the mesh follows the motion. This node is where incompatible or incorrectly connected inputs can reveal themselves quickly, so verify one character before duplicating the pattern.
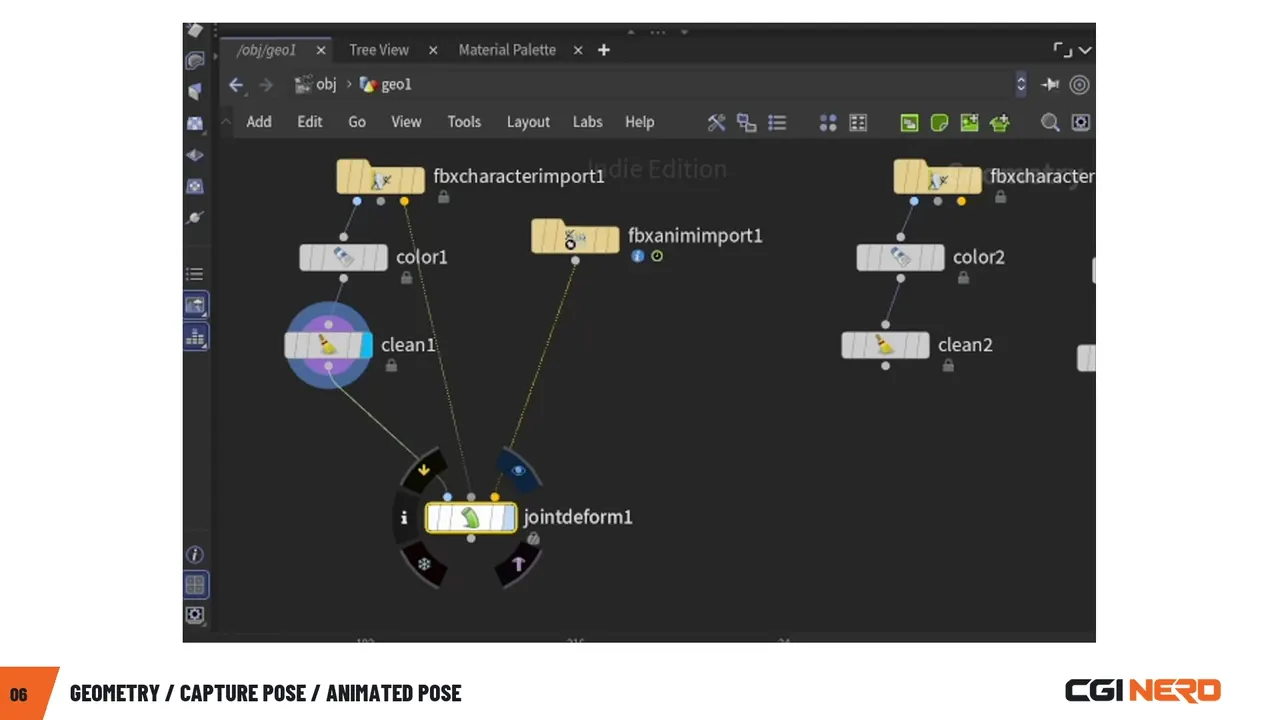
One character branch: check the geometry and skeleton inputs before repeating the setup.
With one animated character working, I repeated the process for the other three, each with its own import/animation/deformation branch, and used a Merge node to view the cast together.
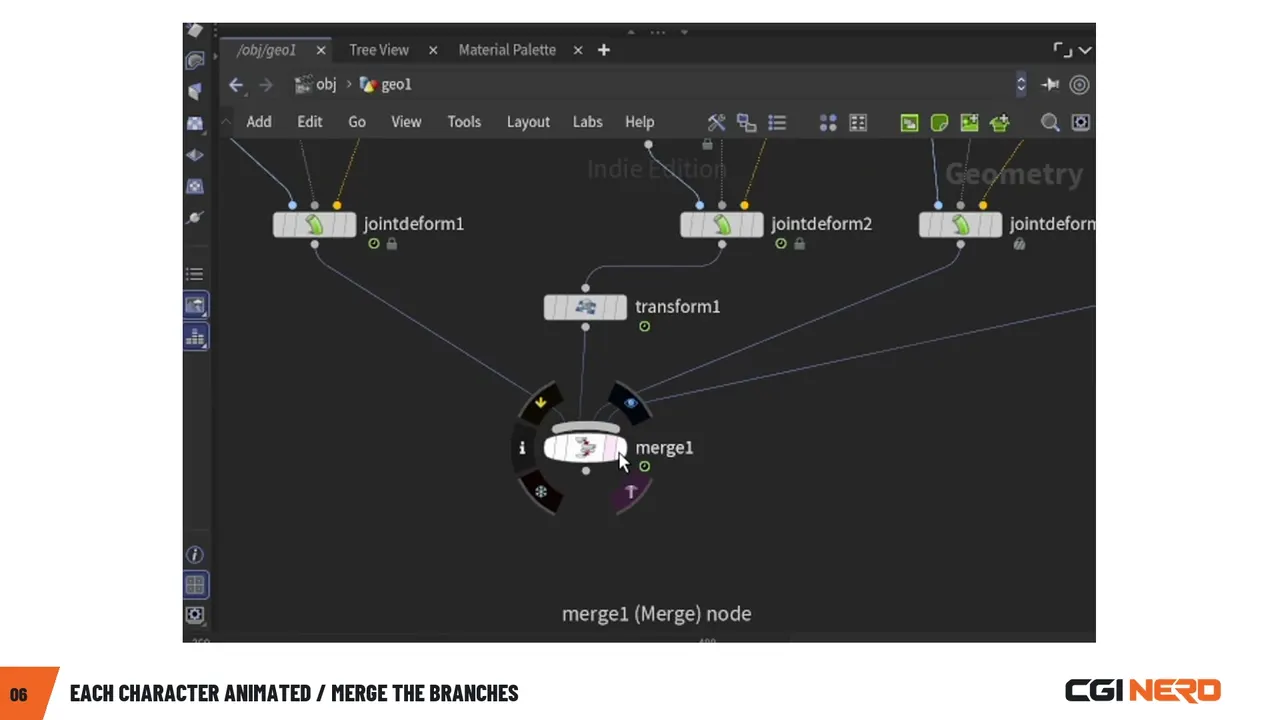
Each character can retain a separate animation branch while contributing to the combined result.
I positioned the characters manually and adjusted the timing where required. For one branch I used a Time Shift expression, $F - 180, meaning that branch samples a frame 180 earlier than the current scene frame. That specific offset was a correction for this performance, not a general formula. I also corrected the sign during the recorded work—a small expression typo can make a large difference to timing.
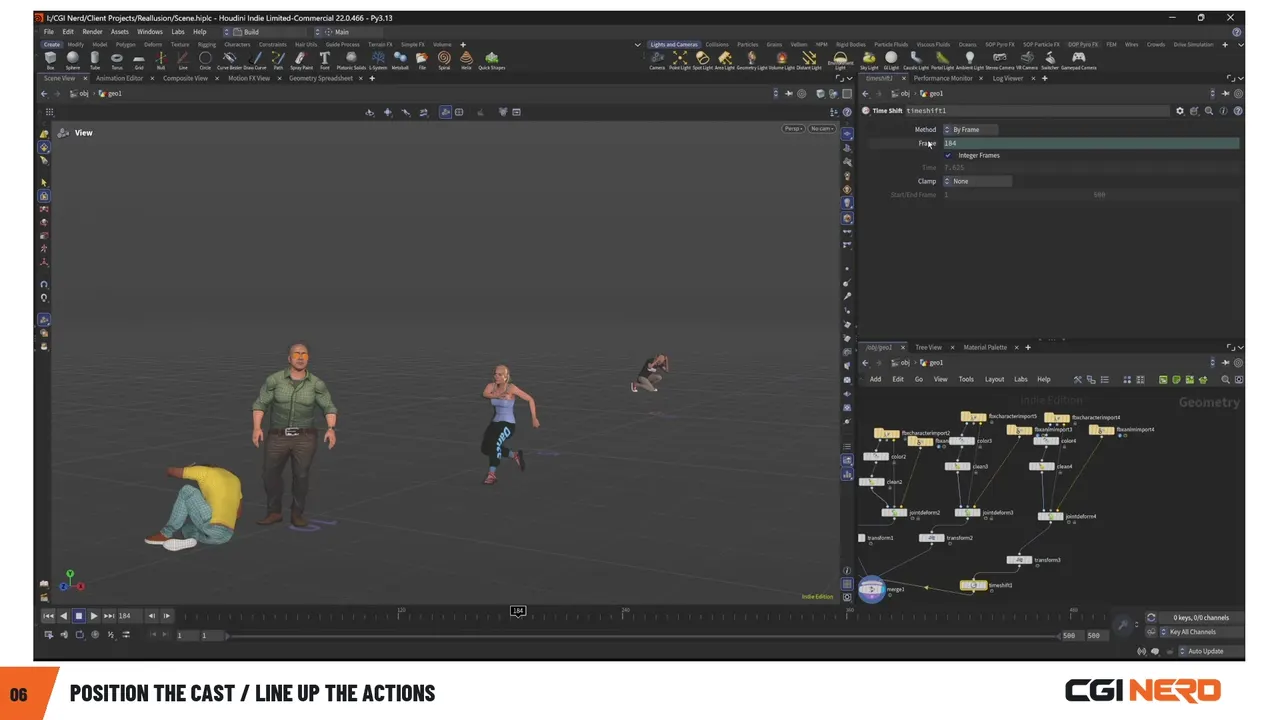
This project used $F - 180 to sample an earlier frame. Check the sign and playback range for your clip.
8. A useful round trip: fix clothing and reload it
When I saw the group moving, I realized an outfit needed changing to suit the jogging action. Back in Character Creator, I discovered an extra shirt layer poking through another garment. I removed the extra layer, adjusted the remaining shirt size, used Conform, and exported the updated character.
Back in Houdini I reloaded the revised character file and checked the same animation again. Being able to improve an upstream character without abandoning the downstream setup was one of the strongest practical outcomes of the experiment.
Troubleshooting the handoffs
| Symptom | What I checked in this experiment |
|---|---|
| The first generation fails | Restart the generation; save a successful character before refining. Three initial attempts crashed here, but the cause was not established. |
| The front looks right, but the profile does not | Compare the side reference and adjust depth and silhouette. The side image is used for refinement. |
| A mesh does not follow its motion | Verify the matching character, capture pose and animated skeleton connections at Joint Deform. |
| The action starts at the wrong moment | Check the source clip range, scene frame rate and the Time Shift expression. |
| Clothing intersects during motion | Check for duplicate garment layers, adjust fit in Character Creator, re-export and reload the mesh. |
What worked, and what I would improve next
What impressed me most about this workflow was how well the different Reallusion tools complemented one another.
Headshot 3 provided an effective starting point for turning reference images into editable 3D characters. Character Creator gave me the flexibility to refine facial features, adjust proportions, and experiment with clothing and accessories. With iClone, I could quickly bring those characters to life using animations I already owned.
One of the most useful aspects was the ability to revisit a character, make changes, and bring the updated version back into Houdini without rebuilding the entire animation setup.
There were a few technical details to address along the way, including mesh cleanup, clothing intersections, animation timing, and the generation behavior mentioned earlier. These were observations from this particular experiment rather than conclusions about the software’s overall reliability.
The result demonstrated something valuable: I could take an AI-assisted character concept, turn it into an editable, animated 3D character, and integrate it into my existing Houdini production pipeline.
If I continued this project, I’d prioritize cleaner final lighting, closer inspection of hair and clothing deformation, and a better camera treatment of the four-character result. The current demonstration is a technical viewport preview, not a finished Karma render or a production-ready crowd simulation.
Recreate the experiment: a focused checklist
- Prepare a clear frontal reference, an optional side view, and a neutral standing body reference.
- In Headshot 3 Image Mode, load the images, select the starting body, generate, and save the successful result.
- Refine facial landmarks and profile, check motion, then add hair and clothes in Character Creator.
- Send the character to iClone, select one motion and verify its complete range.
- Export the clothed character and matching FBX animation, noting your actual preset, frame rate, frame range and texture choices.
- In Houdini, import the character and the corresponding animation; connect capture pose and animated skeleton through Joint Deform.
- Validate one character’s motion before repeating for the others. Merge the branches and adjust placement/timing.
- Revisit Character Creator when you find clothing or styling issues, then reload the updated export and test again.
Resources and disclosures
- Headshot 3 — Image Mode quick guide
- Character Creator 5 — sending a character to iClone
- Character Creator 5 — FBX export guide
- CGI Nerd Learn library, including related Houdini FBX import and character-rigging guides
Disclosure reminder: Reallusion provided Headshot 3 perpetual access in exchange for this review. Character Creator, iClone, Headshot 2, and the animation assets were independently purchased before this collaboration. Illustrative promotional thumbnail treatments may differ visually from the genuine viewport results shown in the tutorial.
This guide documents one specific production test, not a guarantee that every model, skeleton, or export setup will behave identically.